
ONE TOUCH ZOOM 90S-QD - Film camera NIKON - Free user manual and instructions
Find the device manual for free ONE TOUCH ZOOM 90S-QD NIKON in PDF.

| Product type | Compact autofocus film camera |
| Lens | Nikkor zoom 38-90 mm f/4.8-10.5, 5 elements in 5 groups |
| Shutter | Electronic program, speeds from 2.6 to 1/250 s |
| Viewfinder | Real image, approx. 80% coverage, magnification 0.34× at 38 mm, 0.69× at 90 mm |
| Focus | Active autofocus by pressing shutter release, distance 0.7 m to infinity; macro mode 0.3-0.7 m; focus lock |
| Built-in flash | Modes: auto, forced, off, slow sync; range (ISO 100): 0.7-3.5 m (38 mm) / 0.7-1.6 m (90 mm); recycle time approx. 7 s |
| Power supply | 3 V lithium battery type CR2 |
| Dimensions (W × H × D) | Approx. 117 × 64.5 × 49 mm (One Touch Zoom 90s) or 53 mm (QD model) |
| Weight (without battery) | Approx. 215 g (One Touch Zoom 90s) or 225 g (QD model) |
| Compatible film | 35 mm DX-coded cartridges, speed 100-800 ISO (auto) |
| Frame counter | CL control panel, additive display |
| Self-timer | Electronic, 10 s delay, cancelable |
| Red-eye reduction | Dedicated lamp, lights approx. 1 s before flash |
| Date imprint (QD model) | Year/month/day or day/hour/minutes, CR2025 battery |
| Maintenance and cleaning | Clean lens with a soft cloth and ethanol; store in a dry place; avoid magnetic fields and sudden temperature changes |
| Safety | Do not look at the sun through the viewfinder; use only specified battery; do not disassemble the camera; keep out of reach of children |
| Spare parts and repairability | CR2 battery, CR2025 battery (QD), strap (included), CS-L26 case (optional); repair by Nikon authorized service center |
| General information | Brand: Nikon; model: One Touch Zoom 90S-QD; category: film camera; manual available for download |
Frequently Asked Questions - ONE TOUCH ZOOM 90S-QD NIKON
User questions about ONE TOUCH ZOOM 90S-QD NIKON
0 question about this device. Answer the ones you know or ask your own.
Ask a new question about this device
Download the instructions for your Film camera in PDF format for free! Find your manual ONE TOUCH ZOOM 90S-QD - NIKON and take your electronic device back in hand. On this page are published all the documents necessary for the use of your device. ONE TOUCH ZOOM 90S-QD by NIKON.
USER MANUAL ONE TOUCH ZOOM 90S-QD NIKON
For your safety Caring for the Camera and Battery
To prevent damage to your Nikon product or injury to yourself or to others, read the following safety precautions in their entirety before using this equipment. Keep these safety instructions where all those who use the product will read them.
The consequences that could result from failure to observe the precautions listed in this section are indicated by the following symbols:

This icon marks warnings, information that should be read before using your Nikon product to prevent possible injury.
WARNING
Do not look at the sun through the viewfinder
Viewing the sun or other strong light source through the viewfinder could cause permanent visual impairment.
Turn off immediately in the event of malfunction
Should you notice smoke or an unusual smell coming from the equipment, remove the battery immediately, taking care to avoid burns. Continued operation could result in injury. After removing the battery, take the equipment to a Nikon-authorized service center for inspection.
Do not use in the presence of flammable gas
Do not use electronic equipment in the presence of flammable gas, as this could result in explosion or fire.
Do not place strap around neck
Placing the camera strap around your neck could result in strangulation. Special care should be taken to avoid placing the strap around the neck of an infant or child.
Do not disassemble
Touching the product's internal parts could result in injury. In the event of a malfunction, the product should be repaired only by a qualified technician. Should the product break open as the result of a fall or other accident, remove the battery and then take the product to a Nikon-authorized service center for inspection.

Observe proper precautions when handling batteries
Batteries may leak or explode if improperly handled. Observe the following precautions when handling batteries for use in this product:
- Be sure the product is off before replacing the battery.
- Use only a 3 V CR2 lithium battery.
- When inserting the battery, do not attempt to insert it upside down or backwards.
- Do not short or disassemble the battery.
- Do not expose the battery to flame or to excessive heat.
- Do not immerse in or expose to water.
- Do not transport or store with metal objects such as necklaces or hairpins.
- Immediately after use, or when the product is used on battery power for an extended period, the battery may become hot. Before removing the battery, turn the camera off and allow the battery to cool.
- Discontinue use immediately should you notice any changes in the battery, such as discoloration or deformation.

Keep out of reach of children
Particular care should be taken to prevent infants from putting the battery or other small parts into their mouths.

Observe caution when operating the flash
Using the flash close to your subject's eyes could cause temporary visual impairment. Particular care should be observed if photographing infants, when the flash should be no less than one meter (39^ ) from the subject.
Caring for the Camera and Battery
Keep dry
This product is not waterproof, and may malfunction if immersed in water or exposed to high levels of humidity. Rusting of the internal mechanism can cause irreparable damage.
Keep free of salt, sand, and dust
After using your camera at the beach or seaside, wipe off any sand or salt with a lightly dampened cloth and then dry your camera thoroughly.
Do not touch the lens with your fingers
Use a blower brush to remove dirt and dust from the lens. To remove fingerprints or smudges from the lens' surface, use a soft, clean cotton cloth or lens tissue moistened with ethanol (alcohol) or lens cleaner.
■ Handle the lens cover and all moving parts with care
Do not apply force to the lens or to the battery or lens covers. These parts are especially susceptible to damage.
Do not drop
The product may malfunction if subjected to strong shocks or vibration.
Keep away from strong magnetic fields
Do not use or store this device in the vicinity of equipment that generates strong electromagnetic radiation or magnetic fields. Strong static charges or the magnetic fields produced by equipment such as radio transmitters could affect the product's internal circuitry.
Avoid sudden changes in temperature
Sudden changes in temperature, such as occur when entering or leaving a heated building on a cold day, can cause condensation inside the device. To prevent condensation, place the device in a carrying case or a plastic bag before exposing it to sudden changes in temperature.
Batteries
- When you turn the device on, check the battery-level displayed in the LCD panel to determine whether the battery needs to be replaced. The battery needs to be replaced the low battery power indicator appears in the LCD panel.
- Ready a spare battery when taking pictures on important occasions. Depending on your location, you may find it difficult to purchase replacement batteries on short notice.
- On cold days, the capacity of batteries tends to decrease. Use a fresh battery at low temperatures. Keep a spare battery in a warm place and exchange the two as necessary. Once warmed, a cold battery may recover some of its charge.
- Should the battery terminals become dirty, wipe them off with a clean, dry cloth before use.
Storage
- To prevent mold or mildew, store the camera in a dry, well-ventilated area. If you will not be using the product for a long period of time, remove the battery to prevent leakage and store the camera in a plastic bag containing a desiccant. Do not, however, store the camera case in a plastic bag, as this may cause the material to deteriorate. Note that desiccant gradually loses its capacity to absorb moisture and should be replaced at regular intervals.
- Do not store the camera with naphtha or camphor moth balls, close to equipment that produces strong magnetic fields, or in areas subject to extremes of temperature, for example near a space heater or in a closed vehicle on a hot day.
To prevent mold or mildew, take the camera out of storage at least once a month. Turn the camera on and release the shutter a few times before putting the camera away again. - Store the battery in a cool, dry place.
Thank you for purchasing the Nikon One Touch Zoom 90s/One Touch Zoom 90s QUARTZ DATE (QD) camera. Be sure to read this manual thoroughly before use, and keep it handy until you feel confident using the camera. Some of the illustrations show the model with the date function (One Touch Zoom 90s QD).
Your Nikon camera features:
- 35mm compact camera with built-in 2.4X zoom lens from 38 to 90mm focal length range. (p.17)
- Close-up photography in Macro mode for subjects as near as at approx. 0.3 to 0.7m (1.0 to 2.3 ft.). (p. 31)
Symbols used in this manual

:Indicates items to be checked, such as requirements and restrictions.

:Indicates notes and cautions you are requested to follow.

: Indicates supplementary descriptions.

: Indicates pages for reference.
Accessories
The following strap is supplied with this camera.
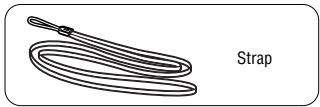
Optional accessory
- Camera case CS-L26
Attaching the strap
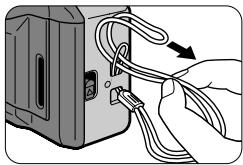
Attach the strap as shown in the illustration.
Table of Contents
For your safety 2
Caring for the Camera and Battery 4
Camera parts 8-10
Body 8
LCD panel 10
Indications in the viewfinder 10
1 Preparations
Installing a battery 11
Turning the camera on 12
Checking the battery power 12
Loading the film 13
2 Basic Operations
Holding the camera properly 15
Operating the Shutter Release button 16
Zooming 17
Shooting 18
Rewinding the film 19
Removing the film 19
3 Advanced Operations
When the main subject is not in the center of the picture 20
Difficult-to-focus subjects 21
Flash photography 22
Procedure for Flash Photography 23
To automatically fire the flash 24
To cancel flash operation 25
To fire the flash intentionally 26
To photograph a person in a night view 27
To reduce "Red-eye" effect 28
Shooting a distant view or landscape through a window 30
Using the self-timer 30
Close-up photography 31
Printing the date/time on pictures (One Touch Zoom 90s QD only) 32
4 Additional Information
Correcting the date and time (One Touch Zoom 90s QD only) 33
Replacing the battery for date (One Touch Zoom 90s QD only) 34
Troubleshooting 36
Specifications 38
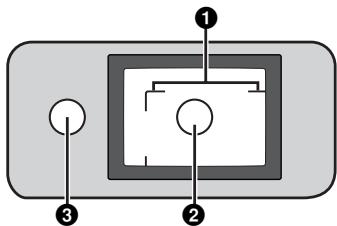
Camera parts (Body)
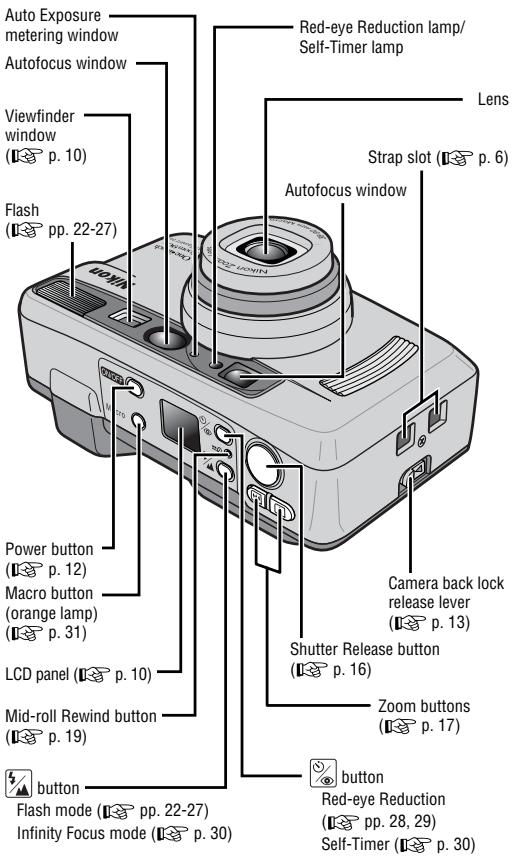
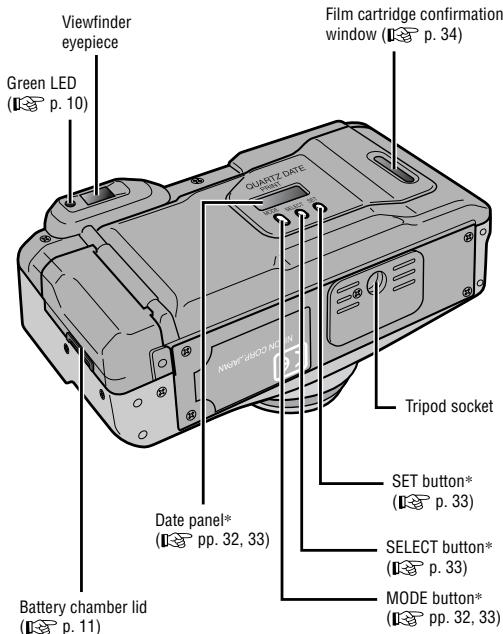
* One Touch Zoom 90s QD only
The illustrations are fully labeled for your reference.
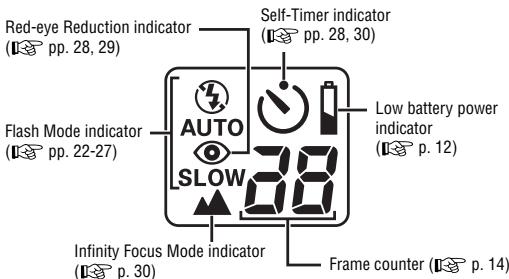
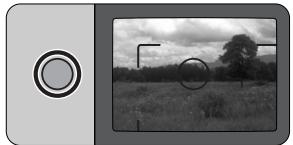
Indications in the viewfinder
1 Parallax compensation marks (p. 31)
For photography in Macro mode at a distance of approx. 0.3m (1.0 ft.), and when shooting a subject at a distance of less than 0.7m (2.3 ft.) with the Zoom in the Telephoto setting.
2Autofocus spot marks (p.18)
Center the main subject to be in focus within this spot.
Green LED
Lights when focus is achieved or when the flash is ready to fire. It blinks while the flash is being charged. If the subject is closer than approx. 0.7m (2.3 ft.), the green LED does not light even when you press the Shutter Release button halfway, and the shutter cannot be released. Note that you may take a picture even if the camera-to-subject distance is extremely short and out of the control range of the camera. However, the focus may not be sharp.

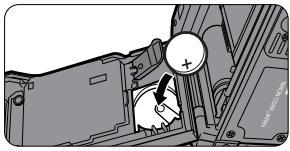
Battery type
Use one CR2 type 3 V lithium battery in this camera.
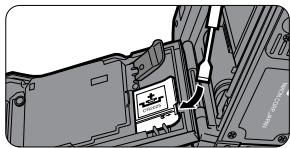
1. Open the battery chamber lid using a coin or equivalent.

2 Install a new battery.
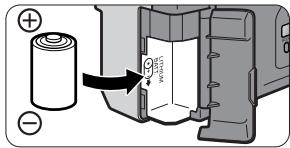
- Observe the correct polarities and insert the battery in the direction shown in the illustration above.
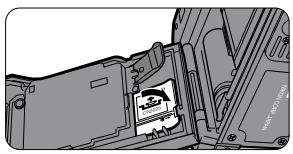
3. Close the battery chamber lid.
Firmly press the battery chamber lid until it clicks shut.
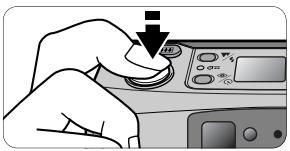
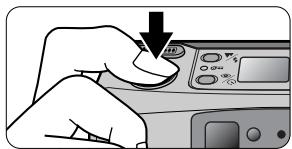
Turning the camera on
Press the Power button.
Once you press the Power button, the camera is turned on, and the lens protrudes. When you press the Power button again, the camera is turned off and the lens retracts.

Auto Power-Off function
The camera is automatically turned off if it is not operated for more than 3 minutes. When the camera is turned off, the lens cover closes, and all shooting modes are reset (except for Red-eye Reduction mode).
Checking the battery power

Make sure that the Low Battery Power indicator (B) is not appeared on the LCD panel.
If "f" is not appeared, battery power is sufficient.
- If " " is blinking, or no indicators on the LCD panel appear, the battery is exhausted. Replace it with a new one.

Always check the battery condition before shooting.

It is recommended to carry spare batteries with you. The batteries may be difficult to obtain in some areas.
Tips on DX-coded 35mm film
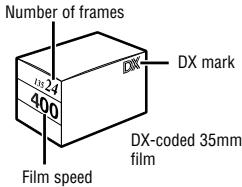
Use DX-coded 35mm film with this camera.
For DX-coded film, film speed is automatically set. Film speeds valid for automatic setting are ISO 100, 200, 400 and 800. (With other films, the film speed is automatically set to ISO 100.)

When loading/unloading film, be sure not to open the camera back cover in direct sunlight.

Recommended film
It is recommended to use ISO 400 film, which provides good results in flash photography, and reasonable protection against camera shake.
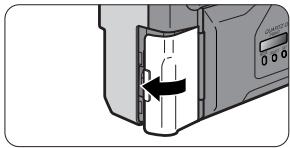
1. Open the camera back.
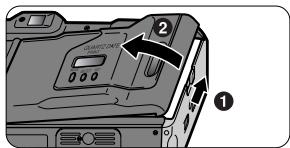
Slide the camera back lock release lever in the direction of the arrow (1) to open the camera back (2).
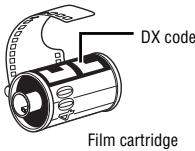
2. Insert a film cartridge.
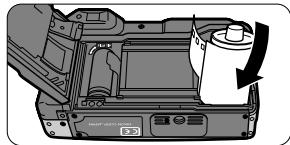
Loading the film (continued)
3. Pull the film leader out to the red index mark.


Hold the film cartridge and ensure film is properly positioned with no slack.
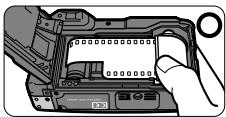
4. Close the camera back, and check that the film has been correctly loaded.
- Once the camera back is closed, the film automatically advances to the first frame. Until film loading is complete, "--" blinks on the LCD panel.
- When the film has been properly set, "i" is displayed on the LCD panel.

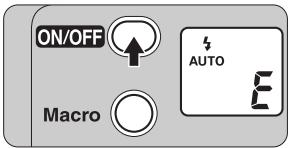
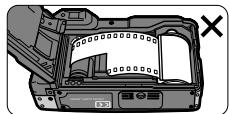
If the letter "E" blinks on the LCD panel, film is not properly loaded. Open the camera back again and reload film.
Holding the camera properly
Hold the camera firmly.
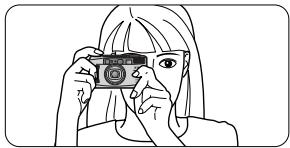
Prop your elbows against your body and hold the camera with both hands.
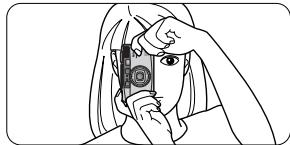
- When holding the camera vertically, make sure that the flash is on top as shown.

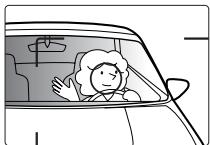
Do not block the lens, autofocus window, or flash with your fingers or hair, or the strap.
Take some trial shots
Before taking important pictures, it is strongly recommended to take a few trial shots first to familiarize yourself with the camera and all its features.
Nikon cannot be held responsible for malfunctions caused by using the One Touch Zoom 90s / One Touch Zoom 90s QD in ways not specified in this manual.
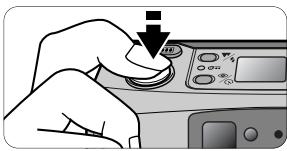
Operating the Shutter Release button
1. Lightly press the button halfway and confirm the green LED lights up.
- When you press the button lightly, the focus and exposure are achieved, and the green LED lights up.
The focus is locked (Focus lock p. 20) while the Shutter Release button is depressed lightly.
2. Fully depress the Shutter Release button to take the picture.

Pressing the Shutter Release button abruptly in one stroke may result in camera shake. Be sure to slowly press the Shutter Release button.

While the green LED is blinking with the Shutter Release button pressed lightly, the flash is being charged, and the shutter cannot be released. Lightly press the Shutter Release button again, if the green LED is not blinking and remains lit release the shutter.

If the subject is closer than approx. 0.7m (2.3 ft.) in the telephoto setting, the green LED does not light even when you press the Shutter Release button halfway, and the shutter cannot be released. Move away from the subject until the green LED lights up. Note that the Shutter Release button may still work even if the camera-to-subject distance is extremely short, i.e., out of the control range of the camera.
Press the Zoom button to compose the picture.
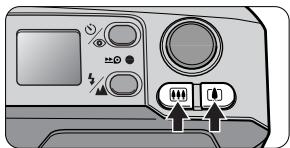
Press the zoom button for telephoto (90mm) photography or the zoom button for wide-angle (38mm) photography.
Remove your finger from the button when the desired image size is obtained.
Example of a telephoto photograph

Example of a wide-angle photograph

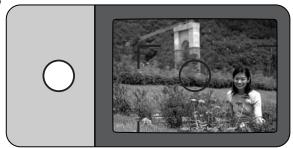
1. Center the autofocus spot mark on the main subject.
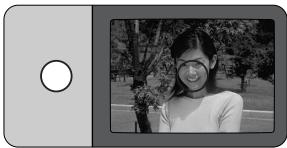

If the main subject is outside the autofocus spot:
If the main subject is outside the autofocus spot, use the focus lock to achieve focus. (p. 20)
2. Lightly press the Shutter Release button halfway.
3. Slowly press the Shutter Release button all the way.
- If the subject is dark in Auto Flash mode, the flash fires automatically.
Pressing the Shutter Release button abruptly in one stroke may result in camera shake.
Rewinding the film
Film rewinds automatically.
At the end of the film roll, the film rewinding starts automatically.
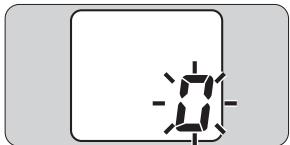
While the film is rewinding, the number on the frame counter decreases one by one. When rewinding is complete, the letter "0" blinks for approx. 10 seconds, then stops blinking and remains lit.
- If rewinding stops midway through the roll because of a dead battery, it resumes automatically as soon as the battery is replaced and the camera is turned on.
Do not open the camera back until the letter "D" starts blinking.
To rewind the film in mid-roll
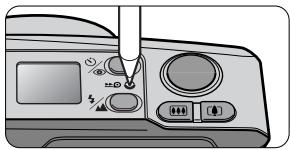
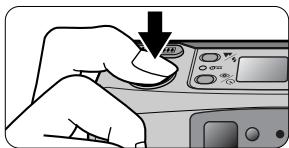
Press the mid-roll rewind (±O) button using the point of a ballpoint pen or equivalent.
- Once rewinding starts, there is no need to keep the button pressed.
Removing the film
1. Make sure rewind is complete by checking the letter "G" indication.
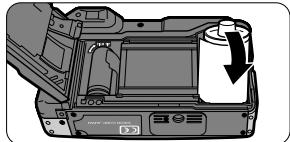
2 Open the camera back and remove the film.
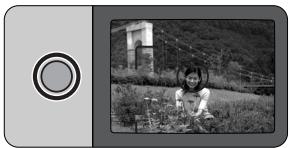
When the main subject is not in the center of the picture
Focus lock photography
When the subject to be focused is outside the autofocus spot in the center of the picture, use focus lock, which enables you to change the picture composition while locking the focus. Also use focus lock for difficult-to-focus subjects described on the next page (p. 21).
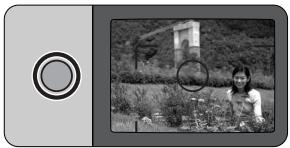
1. Compose the picture.
- If the shutter is released in a condition like that in the above example where the main subject is out of focus.
2. Center the autofocus spot mark on the main subject, then lightly press the Shutter Release button halfway.

Do not change the camera-to-subject distance
While you lightly press the Shutter Release button, the focus is locked. Do not change the camera-to-subject distance.
3. While depressing the Shutter Release button lightly, recompose the picture and depress the Shutter Release button all the way.
Difficult-to-focus subjects
The following subjects may be difficult to focus.
Use the focus lock (p. 20) to focus on another subject equidistant from the camera, then compose the picture to shoot.
Subjects too small to fully cover the autofocus spot mark.
Subjects behind glass.
Dark subjects with no reflection.

Glossy, light-reflecting surfaces, such as shiny cars or water.
■ Subjects without solid content (i.e., candle flame, fireworks, etc.).
Secondary subjects are closer to the camera than the main subject.
Flash photography
Selecting the flash mode
- You can select any of five flash modes by pressing the button.

AUTO
:AutoFlash(p.24)
The flash automatically fires when there is not enough light.

: Infinity Focus (p. 30)
For shooting a distant scene or landscape more sharply. Flash is canceled in this mode.

: Flash Cancel (p. 25)
To cancel flash operation in lighting conditions where normally the flash would automatically fire.

: Anytime Flash (p. 26)
To fire the flash intentionally regardless of the available light.
4 SLOW
: Slow Sync Flash (p. 27)
To brighten both the subject and the background at dusk or in night scenes.

While the green LED is blinking with the Shutter Release button pressed lightly, the flash is being charged, and the shutter cannot be released. Take your finger off the Shutter Release button once and lightly press it again. If the green LED is not blinking and remains lit release the shutter.
Procedure for Flash Photography
- Press the button to select the Flash mode.

Since slow shutter speeds are usually selected in (Flash Cancel) and (Slow Sync Flash) modes, use a tripod to prevent camera shake.
- Compose the picture, then lightly press the Shutter Release button halfway.
- Make sure that the green LED lights up, then release the shutter.

Flash shooting range
The reference distance values are shown below.
With ISO 100 film speed:
(wide-angle) setting:approx. 0.7 to 3.5m (2.3 to 11.6 ft.)
[ ] (telephoto) setting: approx. 0.7 to 1.6m (2.3 to 5.3 ft.)
With ISO 400 film speed:
( wide-angle) setting:approx. 0.7 to 7.0 m (2.3 to 23.1 ft.)
(telephoto) setting: approx. 0.7 to 3.2m (2.3 to 10.6 ft.)
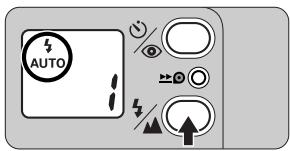
To automatically fire the flash
Auto Flash mode
The flash automatically fires when the subject is dark.
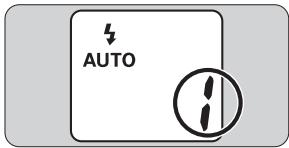
1. Press the Power button.
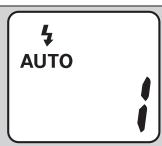
- When you press the Power button, the " AUTO" mark appears on the LCD panel and Auto Flash mode is automatically selected.
2. Make sure that the green LED lights up, then release the shutter.


Example

When the green LED is blinking with the Shutter Release button pressed lightly, the flash is being charged, and the shutter cannot be released. Take your finger off the Shutter Release button once and lightly press it again. If the green LED is steadily lit release the shutter.

If the subject is sufficiently illuminated, the flash does not fire.
To cancel flash operation
Flash Cancel mode
Use this mode in places, such as museums, where flash photography is prohibited.
1. Use a tripod or place the camera on a stable flat surface.

Use a tripod for Flash Cancel mode
Since slow shutter speeds are usually selected in this mode, use a tripod to prevent camera shake.
2. Press the button until " ② " appears on the LCD panel.
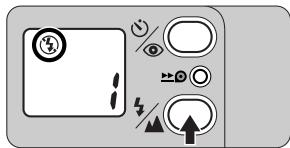
3. Make sure that the green LED lights up, then release the shutter.


Example
To fire the flash intentionally
Anytime Flash mode
Use this mode to intentionally fire the flash regardless of light conditions.
- Press the button until "4" appears on the LCD panel.
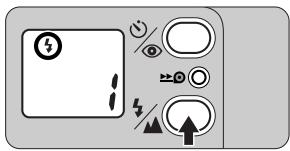
- Make sure that the green LED lights up, then release the shutter.


Example
When the green LED is blinking with the Shutter Release button pressed lightly, the flash is being charged, and the shutter cannot be released. Take your finger off the Shutter Release button once and lightly press it again. If the green LED is steadily lit release the shutter.
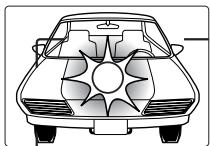
To photograph a person in a night view
Slow Sync Flash mode
Use this mode to brighten both the subject and the background in a night view or at dusk.
1. Use a tripod or place the camera on a stable flat surface.

Use a tripod for Slow Sync Flash mode
Since slow shutter speeds are usually selected in this mode, use a tripod to prevent camera shake.
2. Press the button until " 4SLOW " appears on the LCD panel.
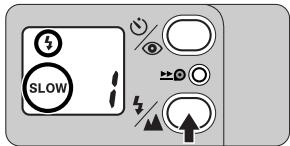
3. Make sure that the green LED lights up, then release the shutter.
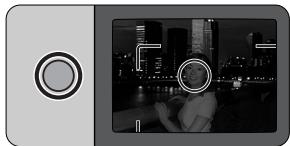

Example
When the green LED is blinking with the Shutter Release button pressed lightly, the flash is being charged, and the shutter cannot be released. Take your finger off the Shutter Release button once and lightly press it again. If the green LED is steadily lit release the shutter. Advanced Operations 27
To reduce "Red-eye" effect
Red-eye Reduction mode
In flash photographs, the subject's eyes may sometimes appear bright red. To reduce this "red-eye" effect, use this mode.
- Press the button until " ⑥ " appears on the LCD panel.
Each time you press the button, the indicator changes in the order shown below:

No indicator: Red-eye Reduction mode canceled To cancel Red-eye Reduction mode.

Red-eye Reduction mode To reduce the "Red-eye" effect.

About Red-eye Reduction mode
When Red-eye Reduction mode is selected, the Red-eye Reduction lamp lights for approx. 1 sec. before the flash fires. Red-eye Reduction is not recommended in shooting situations where shutter release is your top priority.
Red-eye Reduction is canceled in Flash Cancel.

: Self-Timer (p. 30) mode For self-timer operation.
Note that Red-eye Reduction is automatically set when the self-timer is used.
2. Compose the picture, then lightly press the Shutter Release button halfway.

3. Make sure that the green LED lights up, then release the shutter.


Both camera and subject should be still
The Red-eye Reduction lamp lights up for approx. a second before the flash fires. Be careful not to move the camera or let the subject move until the flash fires.

While the green LED is blinking with the Shutter Release button pressed lightly, the flash is being charged, and the shutter cannot be released. Take your finger off the Shutter Release button once and lightly press it again. If the green LED is not blinking and remains lit release the shutter.

Red-eye Reduction mode is not automatically canceled by turning the power off. To cancel Red-eye Reduction mode, press the button until " " disappears from the LCD panel.
Shooting a distant view or landscape through a window
Infinity Focus mode
This mode is good for shooting a distant view more sharply, or a landscape through a window.
Press the button until “” appears on the LCD panel.
2. Make sure that the green LED lights up, then release the shutter.

Flash is automatically canceled in this mode.
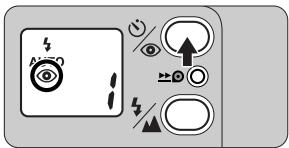
Using the self-timer
Use the self-timer when you wish to include yourself in the picture.
- Use a tripod or place the camera on a stable flat surface.
Press the button until " ” appears on the LCD panel. - Compose the picture, and press the Shutter Release button.
Focus and exposure are achieved by pressing the Shutter Release button lightly.
- When the Shutter Release button is pressed all the way, the Red-eye reduction/Self-timer lamp blinks and lights up for 10 seconds in total before the shutter is released.
After the shot, Self-Timer mode is automatically canceled.

To cancel the self-timer before shooting, once turn off the camera.
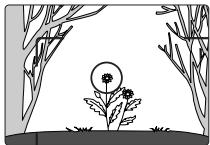
Close-up photography

Minimum camera-to-subject distance is approx. 0.3m (1.0 ft.)
If you wish to shoot a subject such as a flower as large as possible in a picture, you can get as close to the subject as approx. 0.3m (1.0 ft.). The camera-to-subject distance range in Macro mode is approx. 0.3 to 0.7m (1.0 to 2.3 ft.).
1. Press the Macro button.
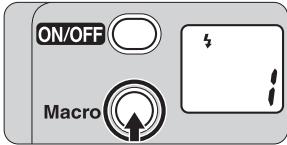
- When you press the Macro button, the button blinks in orange indicating the camera is in Macro mode.
In Macro mode, the lens is automatically set to the angle) position, and Anytime Flash mode is selected.
2. Compose the picture within the parallax compensation marks.
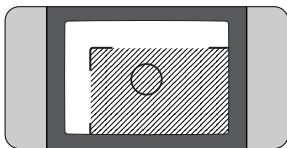

The area marked with in the illustration is included in the picture at a distance of approx. 0.3m (1.0 ft.).
3. Make sure that the green LED lights up, then release the shutter.

Printing the date/time on pictures
(One Touch Zoom 90s QD only)

Select the date/time indicator by pressing the MODE button.
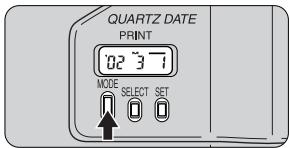
The year is indicated by the last two digits ("02" for 2002) and printed, and the time is in the 24-hour cycle. The example in the illustration shows March 1, 2002.
The letter "M" appears to label the month indication, but it is not printed on pictures.
Each time you press the MODE button, the indicator changes in the order shown below:
Year/Month/Day Day/Hour/Minute No printing

- If "—" is displayed on the LCD panel, the date/time of the shot will be printed on the picture.
Set to " - - - - - - " (no printing) if you prefer the date/ time not to be printed.
Print position of date/time
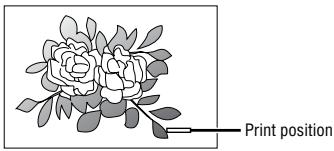
The print position is shown in the illustration.

The printed date/time may be difficult to read if the print position or the subject is:
- White or bright.
Orange or yellow.
32
Advanced Operations
Correcting the date and time
(One Touch Zoom 90s QD only)
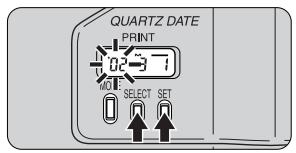
- Press the MODE button to obtain the Year/Month/Day indication.
- Press the SELECT button so that the indicator to be set blinks.
- Press the SET button to set the blinking digit.
Each time you press the SET button, the number advances by one.
Holding the SET button pressed for more than 2 seconds advances the number quickly.
4. When the blinking indicator is correctly set, press the SELECT button again so that the next indicator blinks.
Repeat steps 3 and 4 to set all the digits.
To correct the time, press the MODE button to obtain the Day/ Hour/Minute indication.
Replacing the battery for date
(One Touch Zoom 90s QD only)
If the date/time printed on film is dark or difficult to read, the battery for date must be exhausted. Replace it with a new one.

Battery type
Use one CR2025 type 3 V lithium battery for date with this camera.
1. Make sure that no film is inside, and open the camera back.

You can check whether or not there is film inside by looking through the film cartridge confirmation window (p. 9).
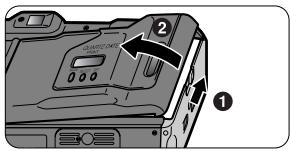
2. Open the date battery chamber lid inside the camera back.
Remove the date battery chamber lid by pressing the portion indicated by the arrow in the illustration, using a screwdriver or equivalent.
3. Replace the battery with a new one.
Install the new battery with the polarity upward as illustrated.
4. Close the date battery chamber lid.
Firmly press the lid until it clicks shut.

The built-in clock is reset when the battery is removed. Remember to set the time and date. (p. 33)
Troubleshooting
Track down the cause of trouble using the following chart. It may save you a trip to your nearest Nikon service center.
| Problem | Check points and solution | Ref. page | |
| Shutter | The shutter cannot be released. | ● The battery is installed with wrong polarity. → Install it with the correct polarity. ● The camera is off. → Press the Power button. When the camera is on, the lens protrudes. ● The green LED blinks. → The flash is being charged. Once take your finger away from the Shutter Release button, lightly press the button again, and release the shutter after the green LED stops blinking and stays lit. ● No indicator on the LCD panel. → The battery is exhausted. Replace it with a new one. ● The camera-to-subject distance is extremely short. → Move away from the subject approx. 0.7m (2.3 ft.), or to take the picture in Macro mode. | 11 12 10, 24, 26, 27 11 10, 31 |
| Flash | The flash does not fire. | ● The green LED blinks. → The flash is being charged. Once take your finger away from the Shutter Release button, lightly press the button again, and release the shutter after the green LED stops blinking and stays lit. ● The camera is in Auto Flash mode. → In this mode, the flash will not fire when the subject is bright enough. To fire the flash, select Anytime Flash mode. ● No indicator on the LCD panel. → The battery is exhausted. Replace it with a new one. | 10, 24, 26, 27 26 11 |
| Focus | The subject appears out of focus in the print. | ● Camera shake. →Gently press the Shutter Release button, or use a tripod or place the camera on a stable flat surface. ● Something in front or in back of the subject is in focus. →Be sure to center the autofocus spot mark on the subject before releasing the shutter. When correct focus cannot be easily achieved, use the focus lock. | 16, 23, 25, 27, 31 18, 20, 21 |
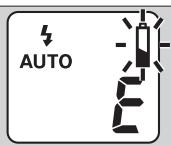
| LCD panel | The numeral “i” does not appear even when film is loaded. | ● “E” blinks on the LCD panel. →Remove the film and load it again. | 13, 14 |
| Date panel | The date/time are not printed on pictures. | ● The battery for date is exhausted. →Replace it with a new one. ● The date panel displays “- - - - - - ” →Set the panel so that it displays the indication to be printed. | 34, 35 32 |
A characteristic of electronic cameras
In rare cases, when strong static electricity or the like is applied to the camera, the camera may not work properly. If this happens, remove the battery and reinstall it.
Specifications
Type of camera
35mm autofocus lens-shutter camera with zoom lens
Usable film
DX-coded 35mm film in film cartridge
Picture format
24× 36mm
Lens
38mm f/4.8-90mm f/10.5, 5 elements in 5 groups
Shutter
Programmed electronic type; also serves as diaphragm blades
Shutter speed
2.6 to 1/250 sec.
Viewfinder
Real-image viewfinder; frame coverage: approx. over 80% , approx. 0.34× magnification at 38mm, approx. 0.69× at 90mm; Diopter: approx. -0.7m^-1
Viewfinder information
Image size frame marks (with parallax compensation marks); Autofocus spot
Green LED indications
Lights up: Ready to shoot
Blinks: Flash being charged
Focusing
Activated by lightly pressing the Shutter Release button.
Distance range from approx. 0.7m (2.3 ft.) to infinity (the shutter cannot be released when the subject is closer than 0.7m), approx. 0.3 to 0.7m (1.0 to 2.3 ft.) in Macro mode (Macro button blinks), Infinity Focus mode available, Focus lock function by lightly pressing the Shutter Release button
Exposure control
Electronically controlled program AE: auto exposure range (ISO 100): EV6-16 at 38mm EV6-18 at 90mm Flash fires automatically if the available light is low; Daylight Sync can be activated
Film speed setting
ISO 100, 200, 400 and 800 film automatically set.
ISO 100 is automatically selected for non-DX-coded films.
Film loading
Film automatically advances to the first frame upon completion of film loading; With a film cartridge confirmation window
Film advance
Film automatically advances after each shot; Auto rewind at the end of film roll; Mid-roll rewind function available
Lens cover
With built-in barrier
Frame counter
Shown in the LCD panel; Additive type; Counts back during film rewind
Self-timer
Electronically controlled; Activated by depressing the Shutter Release button; Self-timer lamp blinks and lights up to show when ready; Timer duration 10 seconds; Cancellable
Built-in flash
Four flash modes available: Auto Flash, Flash Cancel, Anytime Flash, and Slow Sync Flash; Flash automatically fires when there is not enough light; Shutter button is locked while the flash is being charged, Flash shooting range (ISO 100): approx. 0.7 to 3.5m (2.3 to 11.6 ft.) at 38mm , approx. 0.7 to 1.6m (2.3 to 5.3 ft.) at 90mm , (ISO 400): approx. 0.7 to 7.0m (2.3 to 23.1 ft.) at 38mm , approx. 0.7 to 3.2m (2.3 to 10.6 ft.) at 90mm ; Recycling time approx. 7 sec.
Red-eye Reduction mode
Red-eye Reduction lamp lights up for approx. 1 second when flash fires.
LCD panel
Frame counter, Flash mode, Red-eye Reduction, Self-timer, Infinity Focus mode, Low battery power
Battery life
Approx. 15 rolls of 24-exposure film when flash is used for half the exposures.
Power source
One 3 V lithium battery (CR2)
Date print function (One Touch Zoom 90s QD only)
Printed date include year, month, day, hour, (24-hour cycle with no AM/PM) and minute; Leap year adjustment until 2049; Incremental correction of date; Power source: one CR2025 lithium battery
Dimensions (W× H× D)
One Touch Zoom 90s: Approx. 117 × 64.5 × 49mm ( 4.6 × 2.5 × 1.9 in.)
One Touch Zoom 90s QD: Approx. 117 × 64.5 × 53 ~mm ( 4.6 × 2.5 × 2.1 in.)
Weight (without battery)
One Touch Zoom 90s: Approx. 215g (7.6 oz.)
One Touch Zoom 90s QD: Approx. 225g (7.9 oz.)
- Specifications apply when a fresh battery is used at normal temperature (20^ or 68^)
- Specifications and design are subject to change without notice.
Sicherheitshinweise
No reproduction in any form of this manual, in whole or in part (except for brief quotation in critical articles or reviews), may be made without written authorization from NIKON CORPORATION.